This mini-guide will introduce you to EZ-Xpert 2.0. It shows how a typical expert system is built in EZ-Xpert.
Click on a topic in the following Table of Contents to see specific sections of this Mini-Guide.
Table of Contents
Running An Existing Project
System Status
Creating A New Project
Defining Rule Structure
Defining Objects
Defining Conditions
Defining Actions
View Rule Structure
Individual Rules
Browse Rules
Browse Objects
Refinement
Code Generation
Running the Application
Software Notes
View Code
Export / Save As Functions
EZ-Xpert Menus:
Application:
X-perts:
Window:
Help:
Help
Screens Not Shown In the Mini-Guide:
EZ-Xpert Menus
The following is a brief summary of EZ-Xpert menu options and their functions.
- File - menu.
- Open - used to start an existing EZ-Xpert project. The project may be one known to this EZ-Xpert installation or, using the Other option from the File Open screen, an external project.
- New - used to define a new project to EZ-Xpert.
- Close - closes the active project.
- Save As -saves the active project under another name to a different subdirectory. It also identifies this as a different project to this EZ-Xpert installation. To just save the files to a new location, use Export. There is no File / Save function because components of the project are saved individually.
- Project Data -allows editing of the data about the project.
- Import - locates an external project, optionally copies the files into a new location, identifies the project to this EZ-Xpert installation, and loads the project. To only run the project, use File / Open / Other.
- Export - copies the project to an external location.
- Print - prints selected code and definitions about the active project. To print the code, use the Application / View Code option to view the code, then print from WordPad (or your installed text editor).
- Print Setup - standard Windows print setup.
- Software -stores the path and other needed command line information to run external expert system shells such as ART*, CLIPS, and so on.
- Exit - quits EZ-Xpert.
- Cut - standard Windows Cut function.
- Copy - standard Windows Copy function.
- Paste - standard Windows Paste function.
- Rules - used to select a rule cluster and create, edit, or view rules.
- Rule Structure - used to define the structure of a rule cluster, determining the conditions and actions used.
- Conditions Definitions- used to create, view, and edit definitions of the conditions used in the project.
- Actions Definitions- is used to create, view, and edit definitions for the actions used in the current project.
- Object Definitions- is used to create, view, and edit definitions for the objects used in the current project.
- Check - performs an extensive testing of the project. You should not attempt to generate code until the project has no errors.
- Refine - performs logical simplification on a selected rule cluster.
- Generate Code - creates expert system code for the desired host language.
- View Code - shows previously generated code.
- Run - runs generated code in the host expert system shell. The shell must be defined in the File / Software option, and code must already be generated.
- Next Step - an editable explanation of what is next in building the expert system.
- All Steps - explanations of each step in building the expert system.
- Cascade - standard Windows Cascade function.
- Tile: standard Windows Tile function.
- Close Child Windows - standard Windows function.
Running An Existing Project:
From the Main Menu, select File / Open. The File Open screen shown below will show
details of all of the projects known to this EZ-Xpert installation.
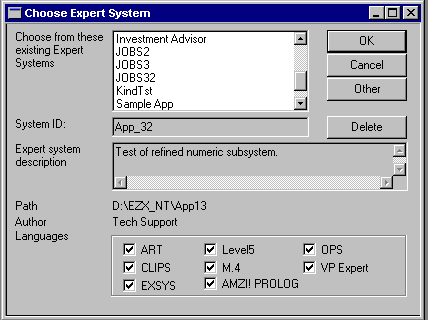
The listbox at the top of the screen shows the description of all installed projects. The rest
of the screen shows details of this project - the project ID, which is also the name used for
generated code, an optional description and author, and the path to the project files. The
bottom display shows the expert system languages supported by this specific project.
When you have located the desired project in the listbox, press OK to start running the project. Cancel returns without opening a project. Other is used to load an external project. Delete removes the project from this display and deletes all of the project files. You may backup a project by Exporting it prior to Deleting it.
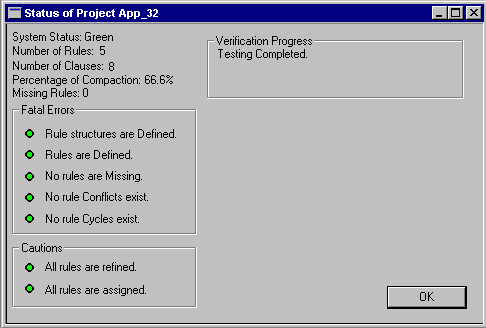 When a project has been loaded, EZ-Xpert will determine the status of the project. It will
then show the Expert System Status screen shown to the left.
You may also select Application/Check at any time to verify your project. EZ-Xpert will test your project for 23 verification criteria. If any verification criteria have not yet been met, then EZ-Xpert will show you a list of the tasks remaining. You may select any of them and click on the Fix Errors button, which will launch the appropriate program function. When all the lights are green, your system is "GO." Your system is free of verification errors.
To create a new project, choose File / New from the Main Menu. The first step in the process is to define the project. This data is shown in the File / Open screen when you open the project later.
 The Make Directory box is used to name the subdirectory where the project files are
saved. It will also be used as the name for the generated code. EZ-Xpert will make a
suggestion for this name, such as App1, but you are free to enter any 8.3 character DOS-
legal subdirectory name. Use the Drive and Directory listboxes to locate the directories
above this new subdirectory.
You must also enter a title for this project. The author and description entries are optional. The boxes on the right side of this screen are used to select the type of chaining the project will use and the expert system languages supported. Press OK to begin the expert system definitions, Cancel to exit without beginning a new project.
Pressing OK defines the project to EZ-Xpert. . This is the only screen unique to defining a new project. You will now select the project through the File / Open menu options, and it will be listed with the other projects.
Any of the screens described after this point may be reached through the menu structure.
This screen is shown after a project is initially defined (File / New) or through the Edit / Rule Structure / Edit Button option.
The Rule Structure Edit screen is used to determine the rule base structure by defining which conditions and actions are used in the rule cluster,. It must have a description. It is also used to designate which rule clusters contain the goal action and to determine the creation method for the rules. EZ-Xpert `Xperts' and Build-Your-Own options constrain the definitions to meet verification criteria, and the User-Supplied Code option is used when the user prefers to code the rules.
 The screen shown above shows how this screen will look when a new project is being
defined. The user will use the New buttons to define new conditions and actions so they
may be used in the project.
Editing Objects
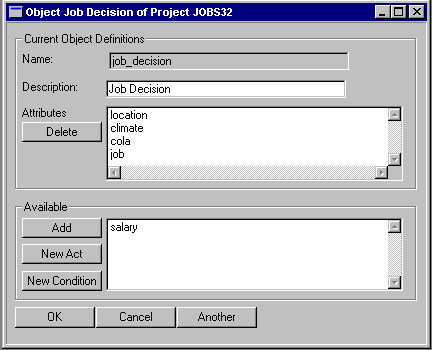 This screen allows creation and editing of Objects. It is reached from the Edit button or the New button
in the Browse Objects screen. The Name is the legal name for the Object. It cannot be edited after the
object is created. The Description is the internal name for the Object used by EZ-Xpert. It is shown in
the Select Objects listbox, for example. The Attributes listbox shows the attributes of this Ojbect.
Note that if an attribute is used as both a Condition and an Action, the same Object owns both the Condition
and Action. The Delete button deletes the currently selected attribute from this object. The Available
box shows the Conditions and Actions which are not attributes of any Object. The Add button adds the
attribute selected in the Available listbox to this Object. The New Act button launches the Actions
Definition screen to create a new Condition. The OK button saves the current definition and closes the
screen. The Cancel button closes the screen with no action. The Another button saves the current Object
Definition and initializes a new Object for definition.
This screen may be reached through File New / Rule Structure / New (Condition) or through Edit / Conditions / New. This screen shows a character variable that receives its value from user input.
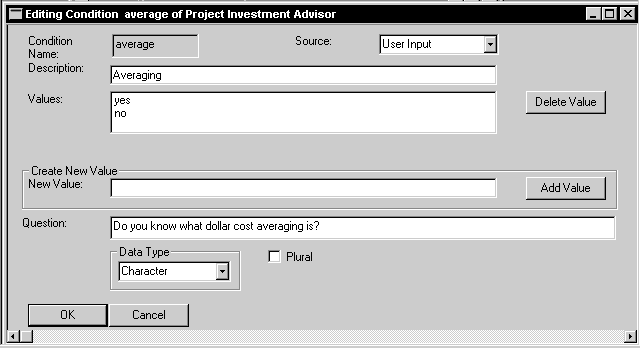 Each condition must be defined and verified before it may be assigned to a rule cluster.
You must enter a legal name and values. A description is also required. Conditions may
be instantiated through user input or other rules. Choose the instantiation method through
the Source listbox. You must also choose the data type (character or numeric) in the Data
Type listbox.
Enter new values into the Create New Value box. Press the Add button to add it to the legal values for this condition. EZ-Xpert will test it prior to including it in the listbox and inform you of any errors for any of the host languages selected for the project. If you wish to remove any of the defined values, select it in the Values listbox and press Delete.
The screen appearance will be different for numeric variables and character variables, as well as user input and rules input. The screen below shows how the screen looks for a numeric variable.
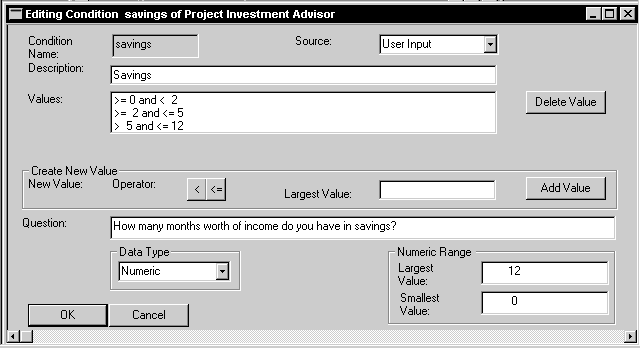 To enter numeric values, choose a numeric operator and input the critical numeric values
in the New Value box. The numeric operators are persistent; they remain in effect until
changed. Numeric variables may also have a defined range. If the Largest Value and
Smallest Value boxes are set to 0, there is no range restriction.
If a condition gets its value from rules, EZ-Xpert will create a new rule cluster and define the condition as an action. Informational messages will be displayed.
Press the OK button to save the definition or Cancel to exit without saving.
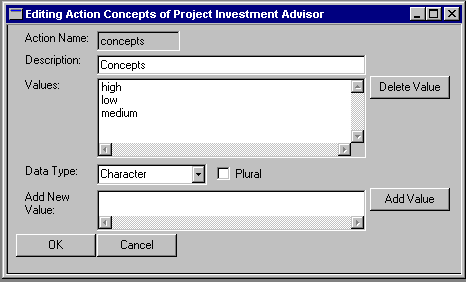
Actions (more correctly called conclusions) must also be defined. The screen shown below shows a completed actions definition. It must have a legal name and values, and a description. This screen works just like the Conditions Definition screen shown earlier. Enter a name and description. Enter values in the New Value box and press the Add Value Button to include it in the legal values. Select Plural if you wish for the variable to have multiple values. Use Delete to remove a selected value. Press OK to save or Cancel to exit without saving.
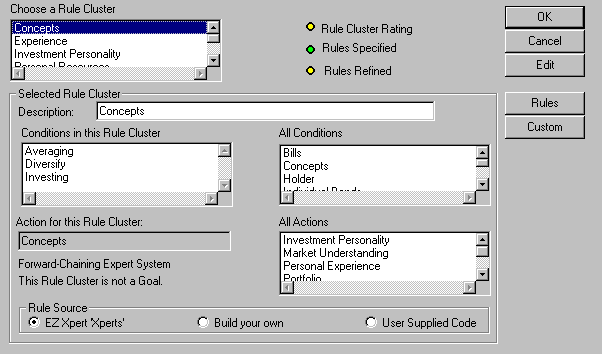
This screen is reached through View / Rule Structure. It shows a summary of all of the rule clusters in the project. The LED display at the top of the screen shows the rule cluster status. Red means that the project contains a fatal error, such as rules that have not been assigned. Yellow indicates that the rules have not been refined; code may still be generated. Green means that the cluster is ready to be used to generate code.
 The Custom Button is used to define a new rule cluster. It is normally used only when
you wish to have multiple rule clusters with the same conclusion. The Rules Button
allows you to create, view, or edit the rules for this cluster. The Edit Button presents the
Edit Rule Cluster screen described earlier. OK and Cancel both exit. Note that there is no
Save function here, because this screen is only used to view the rule cluster definitions.
EZ-Xpert has two screens for building, viewing, or editing rules. If you choose Rules from the Rule Structure screen, the Single Rules screen is shown if the Rule Source EZ- Xpert `Xperts' is selected, while the Browse Rules screen is shown when Build-Your- Own is selected. Either mode may be selected when you choose the Edit / Rules option by clicking on the appropriate radio button.
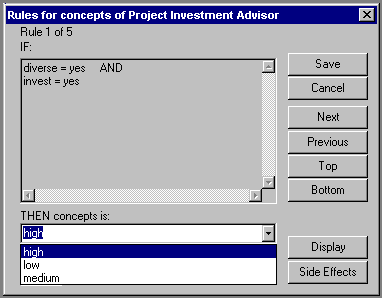 When you initially assign conclusions in the Single Rules screen, every conclusion value
is initialized to "Missing." This is a special assignment that is used to track if rules have
been assigned to the combination of condition values in each rule.
The large box at the top of the screen contains the condition values for this rule. The Then box at the bottom left of the screen contains the action value assigned. To change the value assigned, press the button at the right side of the box to view all of the legal values for the assignment. Choose one by clicking on it. You may assign a special value of "No Assignment," which is represented by a "-"; if this option is selected, no rule will be generated.
The Next, Previous, Top and Bottom buttons are used to move through the rules.
If desired, a Confidence Factor may be assigned in the CNF box. This must be a value from 0 to 100. The default is 100. You may also extend the rule by assigning a Display statement. A small edit box is presented for you to enter the statement that you wish displayed when the rule fires. In addition, you may assign individual side-effect operations to each rule for each language supported. Use caution when creating side effects - they must, of course, be legal statements for the host language, and they are included in the generated code for that language. EZ-Xpert does not verify side-effect code. Note that refinement removes all CNF, Display, and side-effect code.
The Explode option is available only for rules that have been refined and have had one or more conditions removed during refinement. This option expands the refined rule to include all conditions and values that may be present.
The Save Button saves the entire rule cluster and exits, while the Cancel button exits without saving any changes.
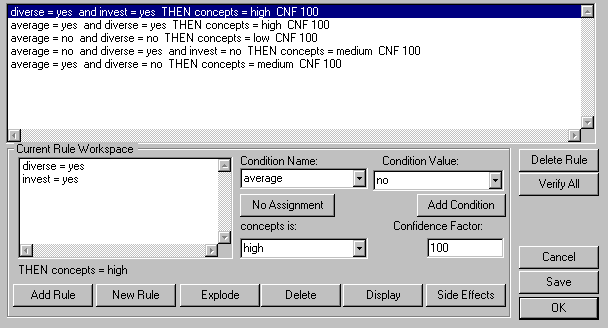
The second screen that may be used to build, edit, or view rules is the Browse Rules screen. It shows several rules simultaneously. Existing rules are shown at the top of the screen, while the bottom contains a workspace to create or edit rules.
In this screen, you create rules by selecting conditions, condition values, and action values from the listboxes. Note that the selected rule in Existing Rules is shown in the Current Rule Workspace. Select the desired condition from the Condition Name listbox, and choose a value for it from the Condition Value listbox. When the selections are correct, press the Add Condition button to add it to the current rule workspace. You may, of course, add CNF, side effects, and Display statements as in the Single Rules option (Refinement removes any CNF, Display, or side-effects). You may also choose "No Assignment" (see the cautions in the Single Rules section about side-effects). The Delete Button in the Current Rule Workspace removes the highlighted condition from the current rule. When your specification is complete for this rule, press the Add Rule Button in the Current Rule Workspace to add it to the Existing Rules list. The New Rule button clears the Current Rule Workspace for the creation of another rule.
The Delete Rule Button, which deletes the selected rule, also puts the rule definition in the Current Rule Workspace. The Verify All Button is used to test for completeness and conflictions.
 In the screen shown above, several rules have not been assigned. Press OK to add the
missing rules (with the assignment "Missing") to the rules that have been assigned.
Cancel returns you to the Browse Rules Screen so that you may continue. If you received
this message from the Verify All button, the missing rules are added to the Existing Rules
listbox so you may make assignments to them.
If you make an assignment to a missing rule or another rule is subsumed by the new rule, EZ-Xpert will ask if you wish to remove any subsumed rules. (You should answer Yes). If the new rule is subsumed by an existing rule or conflicts with an existing rule, EZ- Xpert will inform you, but the new rule will not be added to the Existing Rules.
The Save Button saves the current rule cluster assignments. OK saves and exits. Cancel exits without further saving.
Object assignments are used only in ART*, CLIPS/R2, Level5, and OPS/R2; production rules are generated for EXSYS, M.4, PROLOG, and VP Expert. If an attribute is assigned to an Object, EZ-Xpert will generate object-oriented code for that attribute. If the attribute is not assigned to an Object, EZ-Xpert will generate production rule code.
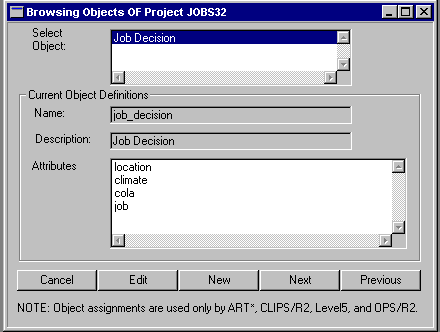 This screen shows the assignment of attributes to objects. It is reached with the Edit / Objects
menu options. The Select Object listbox at the top of the screen shows the descriptions of all the
Objects currently defined in the project.
The Current Object Definitions box shows the definition of the Object selected in the Select Object listbox. Name is the legal name for the Object that will be used in the generated code. Description is the long name used to identify the Object inside EZ-Xpert. The Attributes listbox shows a list of the attributes currently assigned to the selected object. The Cancel button closes the screen with no action while the Edit button launches the Edit Object screen, allowing the user to change definitions. The New Button launches the Edit Object screen, allowing the user to define a new Object. The Next button selects the Object in the Select Object listbox, and the Previous button selects the previous Object in the Select Object listbox.
The Application / Refine option performs logical simplification on the selected rule
cluster. Version 2.0 also performs range simplification. The result of refinement is to
derive the minimal rule cluster for your assignments.
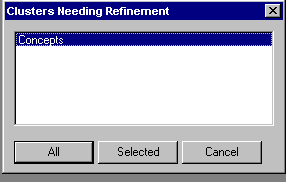 The results of refinement are then displayed for your approval in the Single Rule viewer.
You may edit these rules as described in the Single Rules description.
CAUTION: Refinement removes any CNF, Display, or side-effect code.
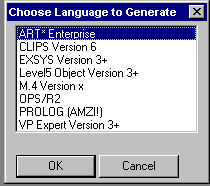
To generate code, select Application / Generate Code. Select the desired language and press OK. EZ-Xpert will then generate a ready-to-run expert system.
A status screen will be shown that shows EZ-Xpert's progress in code generation. When the code has been generated, press OK to view the code.
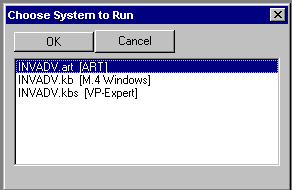
To execute a completed project, choose Application / Run. EZ-Xpert will present you with a list of any expert systems that code has been generated for and the expert system shell has been defined (File / Software) to EZ-Xpert. Select the desired system and press OK.
CLIPS does not load the expert system; this option merely starts CLIPS inside EZ-Xpert. You will still have to Load Constructs inside CLIPS.
M.4 does not recognize .KB files unless it is re-compiled. It will give the error message
EZ-Xpert generates code for the EXSYS rule compiler (EXSYSRC.EXE), not the run- time version.
OPS/R2 code is for the OPS environment. You must use MASM and a C Compiler to use this code.
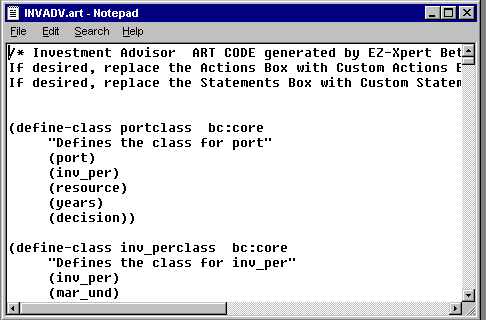 Choose Application / View Code to see the generated code. EZ-Xpert will present you a
list of existing code to select from. Select the appropriate code and press OK to view the
code.
Export is used to copy the project files to an external location for backup or transportation between EZ-Xpert installations. Save As saves the definitions as a new EZ-Xpert project. Both options show the same screen as shown below. Select the drive and subdirectory desired using the listboxes. Enter a new directory to save the files in. Press OK to save the files, Cancel to exit.
Screens Not Shown In the Mini-Guide:
- Edit / Conditions - shows details for all conditions. Press the Edit button to modify the definitions.
- Edit / Actions - shows details for all actions. Press the Edit button to modify the definitions.
- Edit / Software -shows command-line information for installed software. EZ-Xpert shows a green LED for any software that is in the specified location. To add software, enter the path, including extension in the appropriate edit box. Press Test to see if the specification is correct (EZ-Xpert willshow the green LED). Note: You may choose any word processor you wish, but it is best to use a Text Editor (such as WordPad) instead of a Word Processor. If you use a Word Processor, such as MS Word, save the code as ASCII text or the target software will not accept and run the code correctly because of hidden attributes used by the Word Processor.
 A I Developers, Inc.
