Tutorial
This tutorial shows how to
build the EZ-Xpert 3.0 Jobs sample project. As you work through the tutorial,
you may refer to the Jobs sample file to compare it with the tutorial. The tutorial
is organized into eight required Steps in building an EZ-Xpert 3.0 project.
Each Step has hypertext links to the Tutorial topic and the EZ-Xpert screens
used for the Step.
EZ-Xpert 3.0 has two types of user interfaces, Wizards and data entry forms, for all major functions. It is possible to build an EZ-Xpert 3.0 project using only the Wizards and the Debugger. In the tutorial, we will describe both interfaces.
Step 2: Initialize the Project
New Project Initialization Wizard
Step 3: Define the Project Variables
Step 5: Refine and Optimize the Project
The first step in developing an EZ-Xpert 3.0 system is to determine what this iteration of the project is expected to do. The project must contain a goal, which is the output of the project. Various conditions will be tested to determine the goal. It must also be determined how each condition will receive a value. Keep in mind that the rule structure can easily be extended by changing the source of a condition from User to Rules, which will create another set of rules that will determine the value of the condition.
First, design the rule structure for the project. A well-formed rule base is one in which there is one goal, each rule cluster is needed, and each rule cluster can be reached by the Inference Engine. A well-formed rule cluster is one where there is one goal, each condition is independent of the other conditions, and each condition is needed to determine the conclusion in at least one rule.
Next, draw a Knowledge Map showing the definitions of the rule clusters that comprise the rule base as well as the source of each condition. A Knowledge Map for the Jobs sample file is shown below.
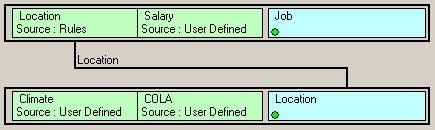
The Knowledge Map shows that this job has two rule clusters; one uses Location and Salary to determine Job, and the second one uses Climate and Cola to determine Location. You need to enter values for Salary, Climate, and Cola, while the condition Location gets its value from another set of rules with the action Location.
We should also consider the values we will use for the variables in the project. We will not define them to EZ-Xpert 3.0 until Step 3, but we should determine what values are appropriate. This determination is often a tradeoff between the rule cluster size and the granularity needed for accuracy.
Step 2: Initialize the Project
Step 2 initializes the project. It defines the project to EZ-Xpert 3.0 by determining the project name, title, description, access, languages supported, and location.
New Project Initialization Wizard
Access this Wizard from the main menu, select Wizards > New Project Initialization Wizard. The following window begins the process of initializing the project.
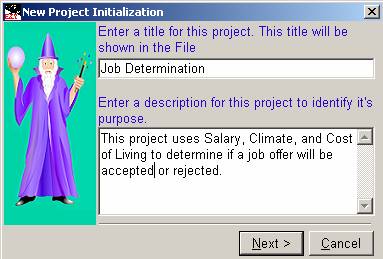
This window requires you to enter a title and description for the project. When the data is entered, click the Next button.
The next window elicits Access, Languages Supported, and a file location to store the project.
Access may be Controlled, which limits your access to both the project and privileges available, or Uncontrolled, which allows any EZ-Xpert 3.0 user access to the project. If Controlled is chosen, the Access button is enabled. Click the Access button to open the User Access window. Access may be changed through the Project Data window.
Choose which language(s) that may ever be used for this project by checking the appropriate checkboxes. It is recommended that all languages be checked, as you cannot add a language after the project is initialized.
Only one EZ-Xpert 3.0 project may exist in a folder (subdirectory). Click the button at the right hand side of the Directory Edit box to activate a directory browser and choose the desired destination. If a subdirectory is added to the path, EZ-Xpert 3.0 will create the new subdirectory.
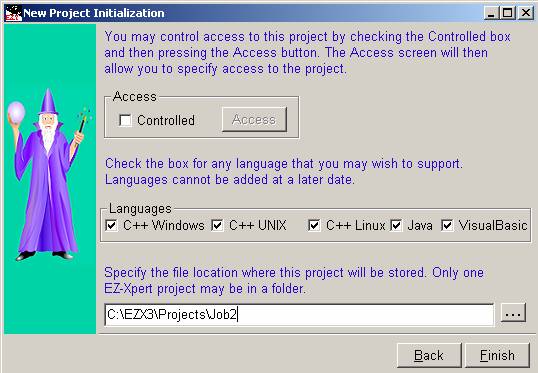
When the Finish button is clicked, the initialization data will be shown in the Project Initialization Editor. Click the OK button to save the specifications and continue.
Project Initialization Editor
This option is accessed from the main menu, select File > New.
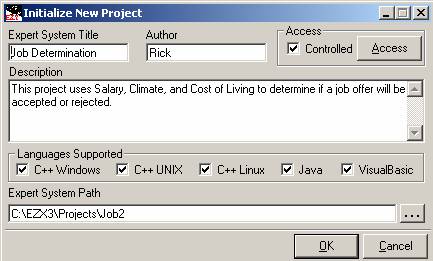
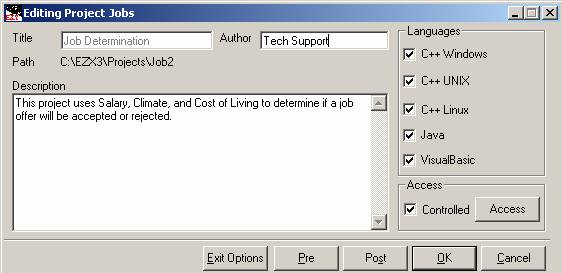
The Title is a description used to refer to this project in the Choose An Expert Systems window. The tutorial uses Job Determination for the title. The Author box is used to record data about the author (optional). The Description is a comment area to store information about the project (optional). Description, and Author may be changed at any time. In the main menu, select File > Project Data.
The Languages Supported check boxes determine which expert system languages will be supported in this project. Check any boxes to select code that you anticipate you may wish to generate during the life of the project. You can delete languages later, but cannot add new languages.
Each project is stored in a unique subdirectory. Select the ellipsis button to select the path to the project subdirectory. All of the files related to the project will be stored in this subdirectory.
Click the OK button to accept your selections and begin defining the project variables. The Cancel button exits the window without saving.
Step 3: Define the Project Variables
The process of defining the project to EZ-Xpert 3.0 involves defining each condition and action used in the project and assigning them to rule clusters. Each condition and action must be defined before it can be assigned to a rule cluster. The rule clusters should be defined from the top down, beginning with the Goal rule cluster, which is the rule cluster containing the final decision, or goal, of the project.
When a project is initialized, EZ-Xpert 3.0 loads the Rule Structure Editor and the Rule Structure Wizard These functions are used to assign Conditions and Actions to rule clusters. New Conditions and Actions may be defined from either interface, but in the Tutorial, we will create the Conditions and Actions first, then assign them using the Rule Cluster Wizard. If they are open, click the Cancel button in both the Rule Cluster Wizard and the Rule Structure Editor to close them.
Action Wizard
To activate the Action Wizard from the main menu, select Wizards > Action Wizard. The goal of the consultation is normally the only Action that is defined. The other Actions in the rule base will be defined as Conditions, which get their values from Rules, and their definitions will be copied to create an Action of the same name.
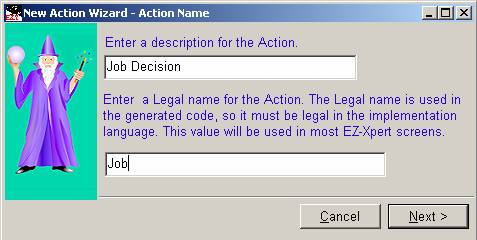
The first window requires you to enter a Description and Legal Name for the Action. The Description is used to identify the Action in the Action Browser, where the Legal Name is used in the generated code. Because the Legal Name is used in code, it must conform to the syntax and constraints (such as reserved words) for the destination language. EZ-Xpert 3.0 displays an error message if the value entered violates these constraints.
After clicking the Next button, the Data Type window is shown. In this window, select the data type for the Action.
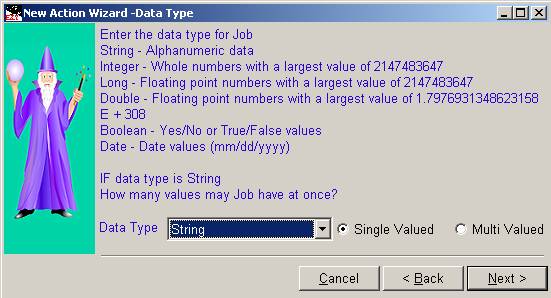
The Data Type specifies the characteristics of the Action. If the Action is text or alphanumeric, use the Data Type String. The Integer data type is used for whole numbers, Long is used for most floating point numbers, and Double is used for very large numbers. Boolean is used when the Action has only Yes and No values, and Date is used when the Action will conclude a date value.
If the Action uses the String Data Type, EZ-Xpert 3.0 supports single value and multi value Actions. If the Action is single-valued, the consultation with this set of rules will test the rule base until it fires one rule, and then exit without testing the rest of the rules in the rule cluster. If the Action is multi-valued, you have the option to find the Best Rule or All Rules (in the Rule Cluster Editor).
Next, the Values Wizard requests you to enter the values that may be assigned to this Action. The appearance of this window is different for each Data Type.
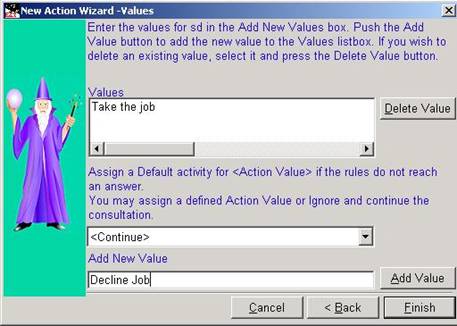
This Action, Job, uses the String Data Type. Enter a value by typing it into the Add New Value box and click the Add Value button. In this sample, use the values Take the job and Decline the job, clicking the Add Value button between each value. Make sure that the values are both complete and concise – enter the minimal set of values that cover all possibilities.
When Incomplete Rule Clusters are tested, it is possible that no rules will fire. The Default box indicates how the system should react when this occurs. One Default option is to assign any of the values that have been assigned for the Action. The Continue option continues the consultation, attempting to solve the goal without this Action value. The Exit option terminates the consultation, indicating that the consultation cannot be solved without this Action value. The final option, Abort, also terminates the consultation. If Exit or Abort is selected, the project will perform any External Activities specified in the project Exit Options.
The New Action Wizard has now elicited all of the information necessary to define the Action. It will now show the definition in the Action Editor. If the definition is accurate, click the OK button to save the definition.
Action Editor
The Action Editor is shown at the end of the Add New Action Wizard. It may also be reached from the main menu, select Edit > Action Definitions. Next, select the desired Action and click the OK button.
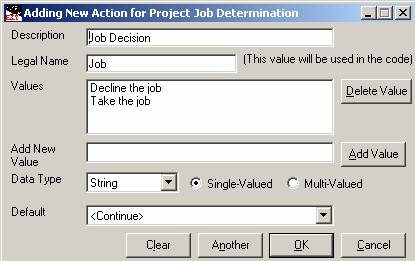
The Action Editor elicits the same information as the New Action Wizard. The Description is free text that is used to identify the Action in the Action Browser. The Legal Name is the value that will be used in the generated code, so it must meet the host language constraints.
Next, select the Data Type. It controls the data entry portion of the window, as we will demonstrate when we define Conditions. If the Action is a String, specify if the Action will have one value at a time (single-valued) or may have many values at the same time (multi-valued).
Enter values in the Add New Values box and click the Add Value button to add the value to the Values list box. If a mistake is discovered after a value has been entered, select the value in the Values list box and click the Delete Value button.
The Default is performed if the rule cluster containing this Action fails to fire any rules during a consultation. You may assign any of the defined values for this Action. The other options are to Continue the consultation without this value, Exit the consultation because it cannot be solved with the current Facts, or Abort the consultation because an error has occurred.
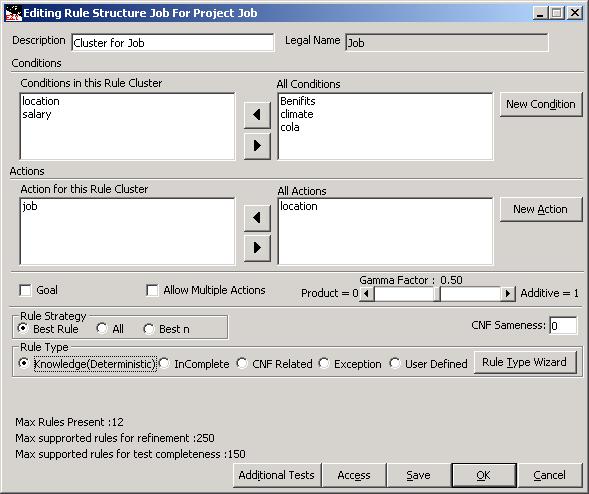
The Job Decision Rule Cluster uses the Conditions Salary and Location to determine the Action Job. Next, learn how to define the necessary Conditions.
New Condition Wizard
EZ-Xpert 3.0 offers a dual interface for the definition of Conditions. The Wizard interface is reached from the main menu, select Wizards > Condition Wizard. The form interface is reached from the main menu, select Edit > Condition Definitions > New.
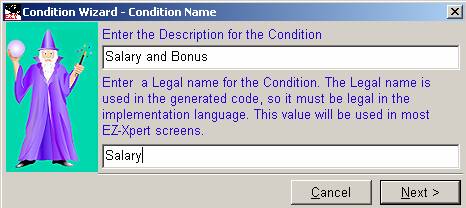
The Condition Name window elicits a Description and a Legal Name for the Condition. The Description is free form text used to identify the Condition in the Condition Browser. The Legal Name is used in the generated code, so it must meet the constraints of the host language.
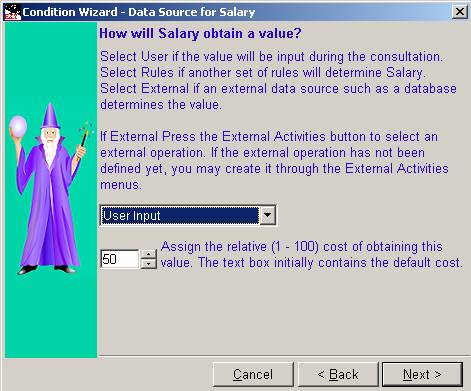
The Data Source window is used to specify how a Condition obtains its value. If the source is User Input, a value will be elicited from the user during a consultation. If the source is Rules, then EZ-Xpert 3.0 initiates a new rule cluster to determine the Condition value. If External is selected, the Condition will obtain it from an External Activity, such as databases or sensors. The External Activity will have to be defined.
The Data Source window also elicits a Cost for obtaining this Condition value. The Cost represents the relative difficulty of obtaining the value, on a scale from a lowest Cost of 1 to the highest Cost of 100. The Default value shown initially is a typical cost for the Data Type of the Condition.
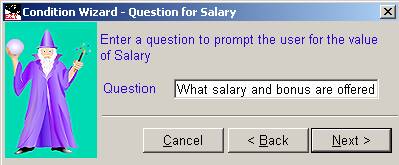
If the Condition obtains its value from the user, we will need to ask the user a question. Enter the question in the Question box.
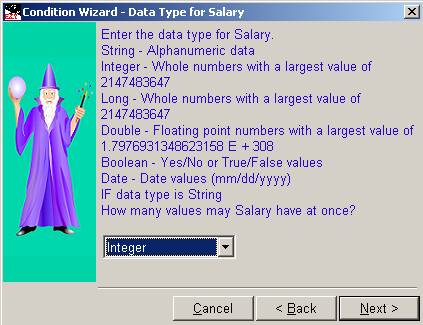
Next, define the Data Type for the Condition. If String is selected, the values will be alphanumeric text. Integer is used for whole numbers, Long for most floating point numbers, and Long is used for large floating point numbers. Boolean is used when the only possible values are Yes or No, and Date is used when a date value is expected. Salary will use the Integer Data type.
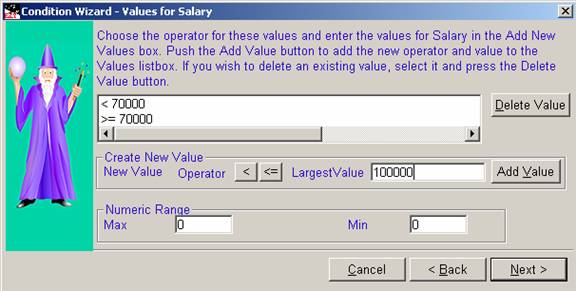
When rules evaluate Numbers and Dates, the rules also determine if the consultation value falls into certain ranges. The values for these Conditions include a logical operator and a value. For Salary, click the < button and enter a value of 70000 in the Largest Value box. When the Add Value button is clicked, EZ-Xpert 3.0 adds this range to those already defined. As this is the first value, EZ-Xpert 3.0 creates another value to cover the rest of the range. As you see in the window above, when we enter < 70000, EZ-Xpert 3.0 creates two ranges - < 70000 and >= 70000. The operator assignment is persistent – it will remain as < until we click <=, for example. Next, enter 100000 in the Largest Value box and click the Add Value button. The rules will test to see if Salary is less than 70,000, 70,000 or larger and less than 100,000, or equal to or greater than 100,000.
It is also possible to constrain the values entered by the user by specifying a numeric range. If both the Max and Min values are 0, the user may enter any value. If any other values are set in these boxes, EZ-Xpert 3.0 enforces this constraint and requires the user to enter values within the specified range.
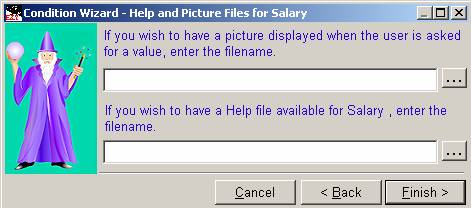
If the source of the Condition value is the user, then EZ-Xpert 3.0 displays a picture when the question is asked of the user. It may also link to a Help file that gives a further explanation of what value is being sought. These files are created by the end user and added to the EZ-Xpert 3.0 project. Click the ellipsis button to launch a directory browser.
The New Condition Wizard has now elicited all of the information necessary to define the Condition. It now launches the Condition Editor and enters the definitions. When the user clicks the OK button, the definition is saved.
Condition Editor
The Condition Editor is reached from the main menu, select Edit > Condition Definitions > New. The Conditions Editor needs different information for different Data Types and Sources, so select these characteristics first. This sample window shows the definitions on an Integer Condition, which obtains its value from the user.
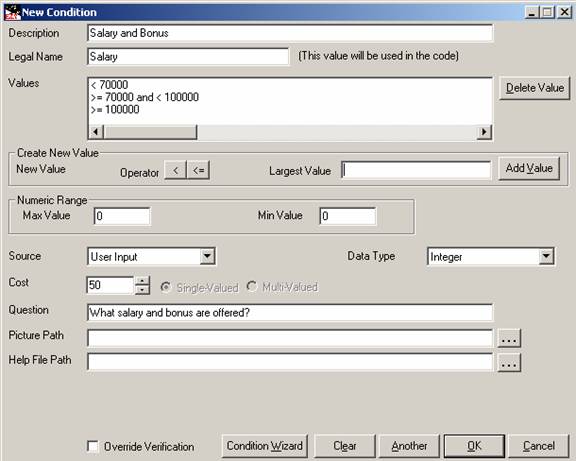
In this example, Salary has a data type of Integer and its source is User Input.
The Description is free form text used to identify the Condition in the Condition Browser. The Legal Name is used in the generated code, so it must conform to the constraints of the host language. EZ-Xpert 3.0 will display an error message if illegal values are entered.
Numeric and Date Data Types need values in the form of ranges. These values consist of a numeric operator and a numeric value. The operator determines what test to perform; for example, < is used when the range includes values below the Largest Value and does not include the Largest Value, as <= would. Click the < button and enter 70000 in the Largest Value box. Next, click the Add Value button to add this range to the Values list box. EZ-Xpert 3.0 creates the other ranges as necessary. Next, enter 100000 in the Largest values box and click the Add Value button. The result of these entries is the set of numeric ranges seen in the Values list box.
Numeric Conditions may have a limited range. For example, a student’s Grade Point Average may have values only from 0 to 4. If the Min and Max values are both 0, EZ-Xpert 3.0 will not constrain the values that you enter. If the Condition has a legal range or values, enter the largest possible number in the Max box and the smallest possible number in the Min box.
If the Data Type for the Condition is String, it may have a single value or have multiple values at the same time. Single-valued Conditions are much more computationally efficient
If the Condition obtains its value from the user, enter a Question to ask during the consultation. For the Condition Salary, the window shows the question “What salary and bonus are offered?”
Enter a Cost value for each Condition that represents the difficulty in obtaining the value. A high Cost, such as 100, could be caused by external processes necessary to determine the value (such as the Condition CAT Scan, which means paying for a CAT Scan) or high computational requirements.
If desired, a picture may be added to the data entry window for the condition, and a Help file may be added to assist the user in answering the question. The user creates these files and the file names are stored in the Help file and Picture boxes.
One option that is contained in the Condition Editor that is not available through the Wizard is the ability to Override Verification. If this box is checked, EZ-Xpert 3.0 will not test the value for host language constraints. This allows the user to enter Legal Names that call functions, for example. If this box is checked, it becomes the user’s responsibility to ensure that this code runs – that the syntax is correct for the host language, and that any necessary libraries are available.
Click the OK button to save the definition and exit the Editor. Click the Cancel button to exit the Editor without saving the definitions. Click the Another button to save the current definition and prepare to define another Condition. Click the clear button to delete the definition without saving and remain in the Editor. Now that you’re familiar with the information needed to define Conditions, click the Another button to load the window so that we may define the other Conditions needed by the project.
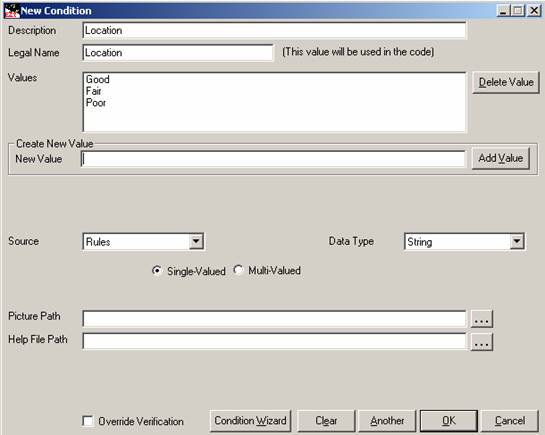
The previous window shows the definition of the Condition named Location. Note that it gets its value from Rules. For this reason, it does not need a Question.
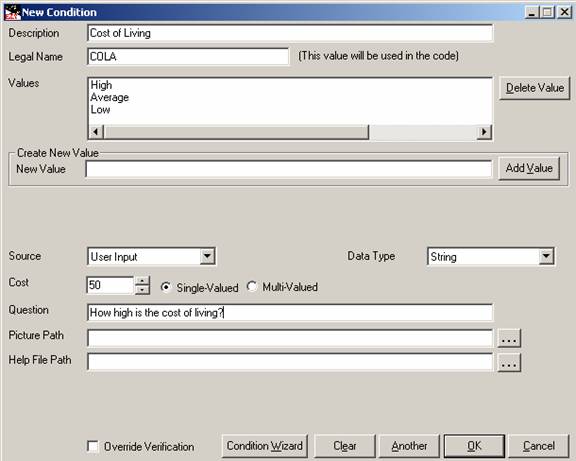
We also need to define the Conditions that determine Location, and which are Climate and Cost of Living. Both of these Conditions are Strings, which obtain their values from the user, so the appearance of their windows is identical.
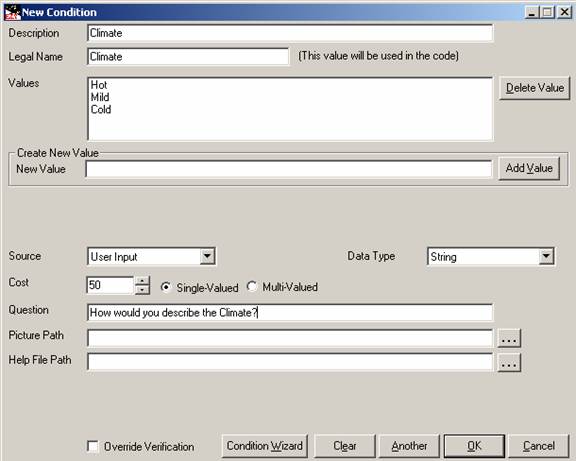
After the definition for Climate is completed, click the Another button so that you can define the Condition Cost of Living. The definition is shown in the next window.
At this point, we have defined all of the Conditions and Actions needed by this version of the Job project. As we saw when we defined Location, we can extend the structure by changing the source of a Condition from User Input to Rules. This will trigger EZ-Xpert 3.0 to initialize a new rule cluster with new Conditions used to determine the value for the original Condition, which is now being used as an Action.
Next, we complete the definition phase by assigning Conditions and Actions to Rule Clusters.
Rule Cluster Wizard
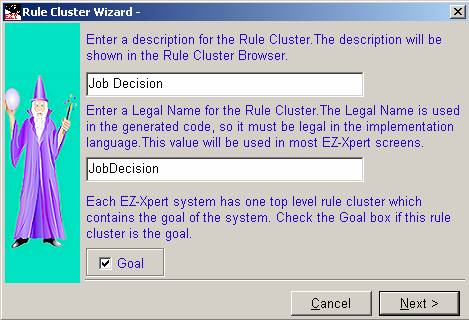
The Rule Cluster Editor can be reached through the main menu, select Wizards > Rule Cluster Wizard. As with other definitions, it begins by eliciting a Description, which contains free form text used to identify the Rule Cluster, and a Legal Name, which must meet the host language constraints that is used in the code.
Each EZ-Xpert 3.0 project contains a single Goal Rule Cluster, which is the top level of the rules in the project. When this Rule Cluster is satisfied, the Action value reached is the output of the project. Check the Goal box only for this top Rule Cluster.
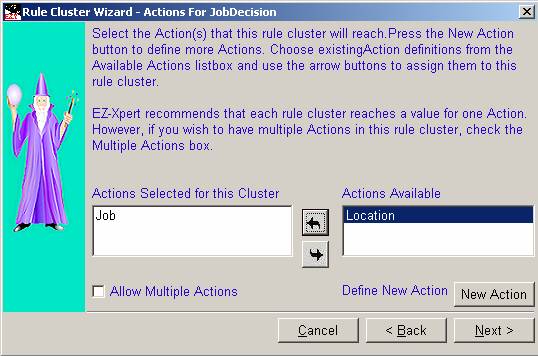
Next, we assign Actions to the Rule Cluster. This top level Rule Cluster assigns a value for Job, which is the Goal of the project. Select the Action in the Available Actions box and click the arrow button to select the Action for this rule cluster. If the desired Action has not been defined, you may click the New Action button and define it.
It is recommended that each rule cluster have a single Action. If you wish to reach multiple Actions from the same set of Conditions, check the Allow Multiple Actions button. EZ-Xpert 3.0 will then allow multiple Actions to be assigned to a single Rule Cluster.
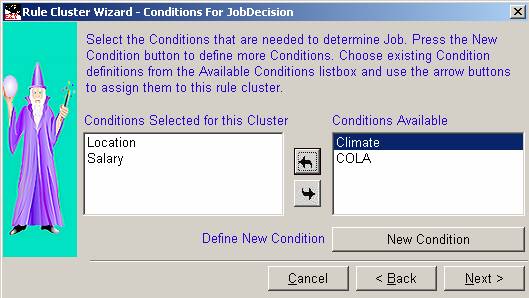
Next, we use a similar window to assign Conditions to the Rule Cluster. In this example, we use Salary and Location to determine Job. The New Condition button allows the definition of new Conditions.
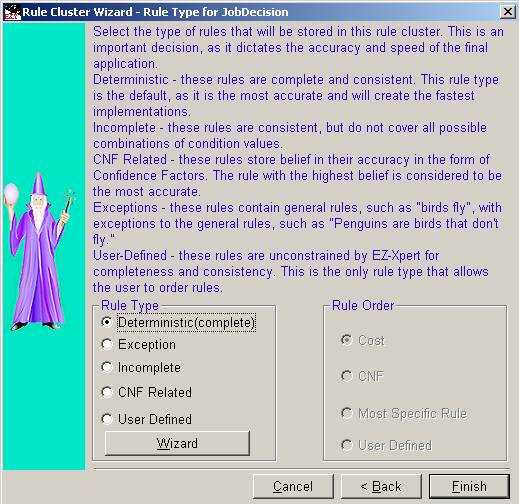
Next, we must specify the Rule Type. The Rule Type is a very important decision, as it dictates the characteristics of the rule cluster and the solution strategy. EZ-Xpert 3.0 supports user-defined rules and the following four types of rules:
- Deterministic rules are consistent and complete. They give the highest accuracy.
- Incomplete rules are consistent, but they are incomplete. Some consultations will not reach a conclusion.
- Rules solved by CNF are normally incomplete and inconsistent. Some consultations will not reach any conclusion, where others will reach a large number of contradictory conclusions.
- Exception rules are inconsistent and normally incomplete. This specification is used for rules like “Penguins don’t fly” (the exception rule) and the rule “Birds fly” (the standard conclusion).
In EZ-Xpert 3.0, the following definitions are used:
Completeness. A rule cluster is complete if every combination of condition values will be
satisfied by at least one rule.
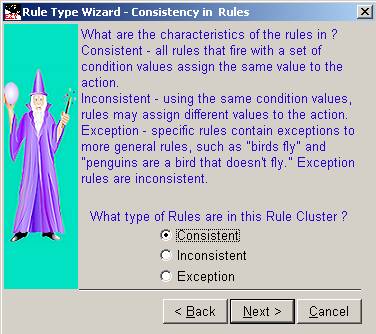
Consistency. A rule cluster is consistent if every rule that is satisfied by any combination of condition values will reach the same conclusion.
Subsumption. A rule subsumes another if the subsuming rule reaches the same conclusion as the subsumed rule, but does it with fewer, but identical, condition values. Subsumption is undesirable in any Rule Type.
There are other considerations in choosing a Rule Type. The truth-preserving refinement algorithms in EZ-Xpert 3.0 are designed for Deterministic rules, and caution should be used when simplifying incomplete rule clusters. Deterministic and Incomplete rules are simplified by Action values only, where CNF and Exception rules also consider the CNF (and the CNF Sameness which we will discuss shortly).
Rule Type Wizard
If you are unsure about the Rule Type, click the Wizard button to launch the Rule Type Wizard. The first window asks if the rules will be complete. In both of these rule clusters, the rules will be complete.
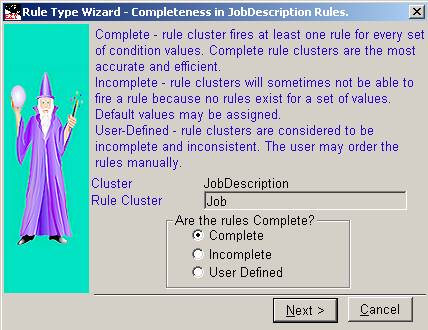
If the rules are Complete, EZ-Xpert 3.0 assigns Deterministic as the Rule Type. If the rules may be inconsistent, or the CNF is the deciding factor, assign Incomplete. You may test any Rule Type for Completeness in the Analyze window reached from the Rule Browser. If the rules are Incomplete, EZ-Xpert 3.0 will next ask about the consistency of the rules.
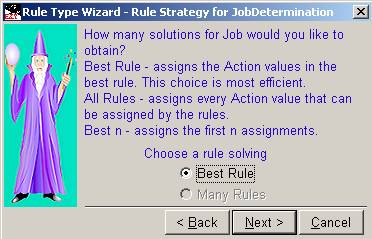
If Incomplete is selected, EZ-Xpert 3.0 needs to know the solution strategy for the rule cluster. As Job is single-valued, the only option is Best Rule. If Job were multi-valued, the user would have all three options available. Best Rule will return the first rule that is satisfied, All Rules will test very rule and return every conclusion, and Best n will return the first n number of rules (such as the Best 5 rules)
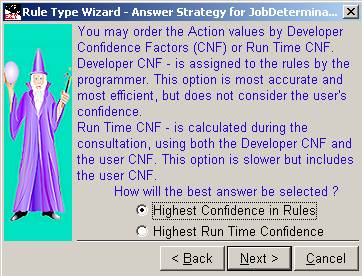
Incomplete Inconsistent rules that do not contain exceptions will be solved by the highest belief in the rules, which is expressed in the rule CNF. EZ-Xpert 3.0 may solve by either the Developer CNF (the CNF assigned to the rules by the rule builder) or the Run-Time CNF (which calculates the confidence using both the Developer CNF and the CNF) entered by the user during the consultation. For single-valued Actions, Developer CNF is much faster because it quits testing rules after the first rule is satisfied. If the Run Time CNF option is selected, all of the rules in the cluster must be tested to determine which satisfied rule has the highest overall confidence.
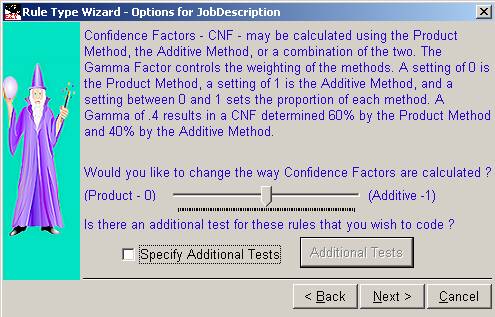
The next window elicits options for the rule cluster. Confidence Factors (CNF) calculations may be performed with either the Product method or the Additive method. The Product method is decreasive – a low CNF can never be raised. The Additive method, on the other hand, is increasive – a low CNF will be raised by higher CNFs assigned to other conditions. EZ-Xpert 3.0 supports a Gamma Factor, which shows weights for the two types of calculations. A Gamma factor of 0 uses only the Product method, a Gamma Factor of 1 uses only the Additive function, and a Gamma Factor between them indicates the weighting used for the calculations.
A second option is to add user-supplied code to perform additional tests. This option allows the user to extend the testing done by EZ-Xpert 3.0. This code is implementation-specific. EZ-Xpert 3.0 does no testing on user-supplied code.
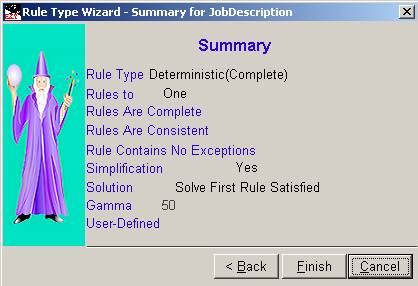
When the specifications are complete, EZ-Xpert 3.0 displays a summary window.
When the Rule Cluster Wizard has completed its tasks, the specifications are displayed in the Rule Cluster Editor.
Rule Cluster Editor
The Rule Cluster Editor displays the specifications for each rule cluster. It contains two additional functions, which control Access to the rule cluster and the CNF Sameness adjustment.
The Description of the rule cluster is used to identify it in the Rule Cluster Browser, while the Legal Name of the rule cluster is used in the generated code. The Conditions and Actions used in the rule cluster are selected from the list of available Conditions and Actions. New Conditions and Actions can be defined by clicking the appropriate buttons.
The Goal box is checked only for the top rule cluster in the project. Only one goal can exist. The Multiple Actions box is checked to allow more than one Action in the rule cluster. Multiple Actions are supported but discouraged. The Gamma Factor slider adjusts the weighting of different calculations for CNF. A Gamma Factor of 0 uses only the Product method, which is decreasive. A Gamma Factor of 1 uses only the Additive method, which is increasive. The two calculations are weighted by the ratio set in the Gamma Factor.
The Rule Strategy radio buttons controls how many solutions will be sought for this rule cluster. If the Action is Single-valued, only the Best Rule option is available. If the Action is Multi-valued, Best Rule, All Rules, and Best n (such as the Best 5 rules) are available.
The Rule Type selects the characteristics of the logic in the rulers. Deterministic rules are complete and consistent, and are the default Rule Type. Incomplete rules are consistent, but not contain solutions for every consultation because of incompleteness. CNF related rules determine the best solution by comparing CNFs of all the Actions that are assigned by the rules. IF CNF related is selected, the user may also chose to use either the Developer CNF contained in the rules, or to use the Run-Time CNF, which calculates the overall confidence in the rule using both the Developer CNF and the CNF entered by the end user during the consultation.
If User-defined rule is selected, the developer is asked to specify the rule ordering for the rule cluster. Cost orders the rule for the lowest solution cost. CNF orders the rules by the Developer CNF. Most Specific Rule orders the rule by specificity, so that exception rules are tested before the more general rule. Finally, the user may choose to order the rules manually. The Rule Browser contains buttons that allow the rules to be ordered when this option is selected.
The Additional Tests button allows the developer to add user-coded tests to all of the rules in the rule cluster. EZ-Xpert 3.0 does not perform any testing on user-supplied code.
The Access button allows the assignment of privileges for this rule cluster. This option is available only for projects that are Controlled. Experts may be assigned to individual rule clusters.
The CNF Sameness control is used during simplification of CNF and Exception rule clusters. Deterministic and Incomplete rule clusters base their simplification only on the Action values. The CNF Sameness specifies a numeric range of CNFs that can be considered as having the same CNF for simplification purposes only. If the CNF Sameness is 20, for example, a rule with a CNF of 80 can be simplified with a rule that has a CNF of 100 or a rule that has a CNF of 60. A rule with a CNF of 50, on the other hand, would not be simplified.
Debugger
You should periodically run the Debugger to determine what steps to determine the state of the project. The Debugger analyzes the project and returns an ordered list of the errors. At this point, the project is in its initial stages as shown in the Status of Project window.
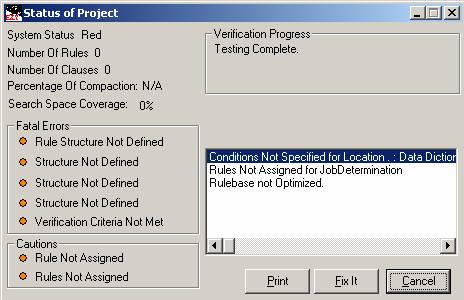
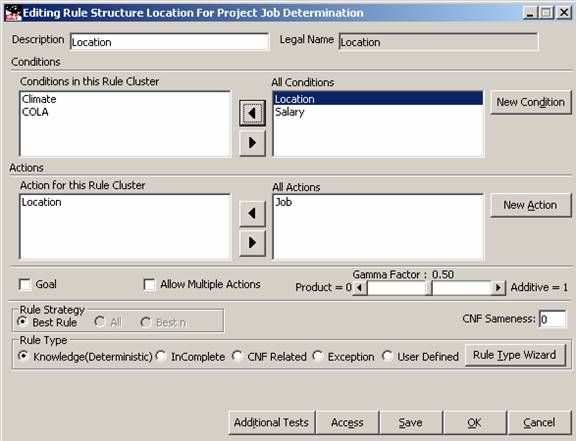
The rule cluster Location was created by EZ-Xpert 3.0 because the Condition Location obtains its value from rules. This cluster assigns a value to Location, which is now used as an Action. To define the rule cluster, click the Fix It button to launch the Rule Cluster Editor.
The Location rule cluster has already assigned the Action Location. The Conditions in this rule cluster are Climate and COLA. Select them in the Available Conditions list box and press the arrow keys to move them to the Conditions in this Rule Cluster list box.
The rules for Location are also Deterministic, and the Best Rule strategy is used for Deterministic rule clusters. The definition for the rule cluster is now complete. Click the OK button to save the definitions.
We have now defined the meta data about the project. We will now use this to create rules.
EZ-Xpert 3.0 offers two rule builders. The Rule Xpert is used only for Deterministic rules. It generates a complete set of condition values. The developer then assigns Action values to each rule. To activate the Rule Xpert from the main menu, select Edit > Rules.
Rule Xpert
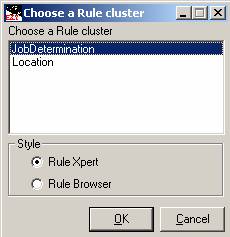
This window is used to select both the rule builder and the rule cluster. To assign rules to JobDetermination in the Rule Xpert, click the OK button.
The top portion of the Rule Xpert contains the conditions and their values, The THEN combo box is used to assign a value to the Action. As the window indicates, no value has been assigned to this rule. The Rule Xpert shows one rule at a time. Move from one rule to the next rule by using the navigation buttons.
The Rule Xpert has several options.
- The CNF may be set using the spinners. The legal range for CNF is 0 to 100.
· External Activities may be executed when the rule is satisfied. These include performing database operations, sending a signal to a sensor, sending an email, or loading a web page.
- User code may be added to the activities performed when the rule is satisfied. This code is user supplied and host language-specific. EZ-Xpert 3.0 performs no tests on user-supplied code.
- The Display option displays a message in the Consultation Complete window.
- When rules have been refined, the Explode button may be used to undo the simplification and express the current rule in the most specific manner.
- The Refine button is used to simplify rules.
Assign the following values (following THEN) for Job Decision to the rules. Assign a CNF of 100 to all of the rules. Press the navigation buttons to move between rules. Click the OK button to exit the Rule Xpert.
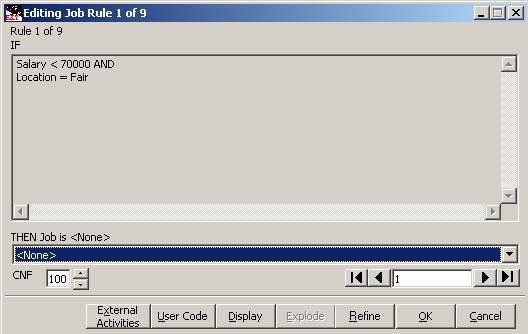
1. IF Salary < 70000 and Location = Fair THEN Job = DeclineJob
2. IF Salary >= 70000 and Salary < 100000 and Location = Fair THEN Job = TakeJob
3. IF Salary >= 100000 and Location = Fair THEN Job = TakeJob
4. IF Salary < 70000 and Location = Good THEN Job = TakeJob
5. IF Salary >= 70000 and Salary < 100000 and Location = Good THEN Job = TakeJob
6. IF Salary >= 100000 and Location = Good THEN Job = TakeJob
7. IF Salary < 70000 and Location = Poor THEN Job = DeclineJob
8. IF Salary >= 70000 and Salary < 100000 and Location = Poor THEN Job = DeclineJob
9. IF Salary > 100000 and Location = Poor THEN Job = TakeJob
When the final rule is completed, click the OK button to exit the Rule Xpert.
The second rule builder is the Rule Browser. It is the only rule builder available for Incomplete, CNF, Exception, and User-Defined rules. It is reached from the main menu, select Edit > Rules. Select the Location rule cluster and the Rule Browser and click the OK button.
There are two methods for creating a rule in the Rule Browser. The Wizard button launches the Rule Wizard, The New Rule button opens the Rule Editor. First, create a rule with the Rule Wizard.
Rule Wizard
Open the Rule Browser by selecting Edit > Rules > Rule Browswer > Location, and press the Wizard button.
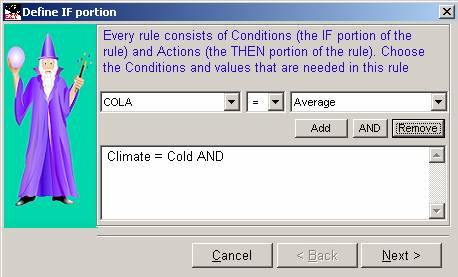
The first window builds the IF portion of the rule. Select the Condition name in the left hand box. Select the value for this Condition in the right hand box. If the Condition is numeric or date data types, select the operator from the middle box. Click the Add button to add this Condition operator / value combination to the rule. For this rule, assign Cold to Climate and Average to COLA.
The AND button must be clicked between each Condition. If you wish to remove a part of the rule, select in with the mouse and click the Remove button. When the IF portion of the rule is completed, click the Next button.
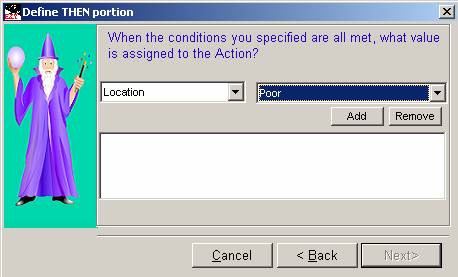
The THEN portion of the rule assigns a value to the Action of the rule. For this rule, assign a value of Poor to Location. Click the Next button and the CNF window is shown.
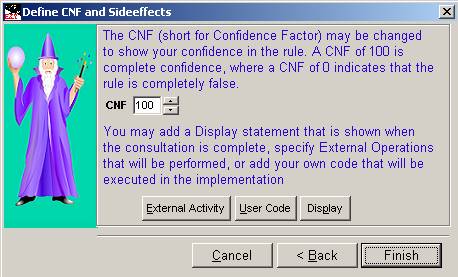
The CNF is used to express the belief in the rule itself. This CNF is referred to as the Developer CNF, as it is assigned by the rule builder. Deterministic rule clusters normally have a CNF of 100, so we will assign 100 to the rules in Location also.
When a rule is satisfied, several activities may be performed. The External Activities button is used to assign a database operation, sensor signal, email, or web page to be performed. The User Code button allows the user to include language-specific, user-supplied code to be performed. The Display button is used to create a message that will be shown in the Consultation Complete window. When the specification is complete, click the Finish button.
When the Rule Wizard exits, it returns to the Rule Browser. The new rule is shown in the grid at the top of the window.
Custom Rule Builder
The second way to create a new rule in the Rule Browser is the New Rule Button, which launches the Custom Rule Builder.
The Custom Rule Builder is used to create individual rules. In the top portion of the window, the IF portion of the rule is built by selecting the Conditions and values from the boxes, and the Action value is assigned in the THEN portion of the window.
The usual buttons are used to specify an External Activity (database, sensor, email, web page) that is performed when the rule is satisfied. The User Code button is used to add user-supplied language-specific code, which is performed when the rule is satisfied. The Display button is used to add a message to be shown in the Consultation Complete window.
The Custom Rule Builder also supports OR operators and parenthesis to group them. When an OR operator is used, EZ-Xpert 3.0 will transform the rule into Conjunctive Normal Form (using only AND operators) when saving the rule into the Rule Browser.
The Custom Rule Builder testing for Subsumption and Confliction can be turned off for CNF and Exception Rule Types. Confliction occurs when two rules give different Action values when given the same condition values. Subsumption occurs when two rules reach the same conclusion, but the conditions in the subsuming rule are a subset of the conditions in the subsumed rule.
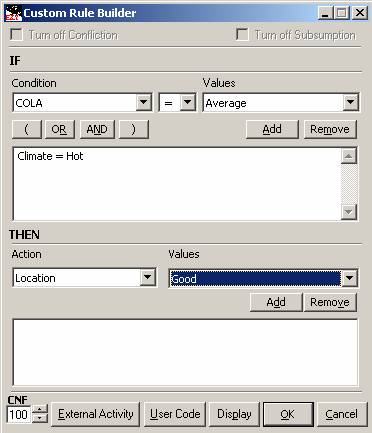
Open the Rule Brower for the Location rule cluster by selecting Edit > Rules > Location > Rule Browser. Press the New Rule button and create a rule that states if the Climate is Hot, THEN Location = Good. Click the OK button to save the rule and return to the Rule Browser. Create an
At any point in the creation of the rules for a rule cluster, the Analyze window can be used to evaluate the rules.
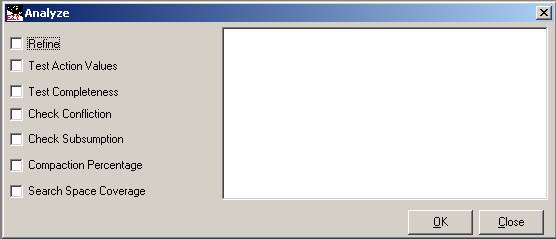
The options in the Analyze window are:
· Refine: performs simplification on the rule cluster.
· Test Action Values: determines if all Action values have been used in the rule cluster.
· Test Completeness: tests the rule cluster for Completeness, and optionally creates the missing rules.
· Check Confliction: tests the rule cluster for conflicting rules.
· Check Subsumption: tests the rule cluster for subsumed rules.
· Compaction Percentage: measures the effectiveness of refinement by showing the relationship between the existing rules and the Cartesian product of the condition values.
· Search Space Coverage: determines how much of the potential search space is covered by the existing rules.
It should be noted that these operations become slow when large rule clusters are analyzed, and that it is possible to create rule clusters that are simply too large to fit into the available memory. Warnings are given in the Rule Cluster Editor when creating the structure for these rules. The Chess End Game sample file contains a maximum of 648 rules. The initial simplification of a rule cluster with this many physical rules may take half an hour. The CardiacFactors rule cluster in the Cardiac sample file is a Huge Rule Cluster (containing about 500,000 possible rules) that most computers cannot fit into memory for Completeness testing.
To determine the completeness of the rule cluster, check the Test Completeness box and click the OK button. EZ-Xpert 3.0 will respond that 5 rules are missing. Click the Yes button to add the missing rules. The Refine algorithm accepts missing rules and simplifies them also. Check the Refine box and click the OK button. When refinement is completed, Close the Analyze window and the missing rules are shown in the Rule Browser. You can identify the missing rules by the blank entry in the Action column.
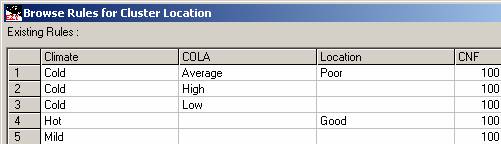
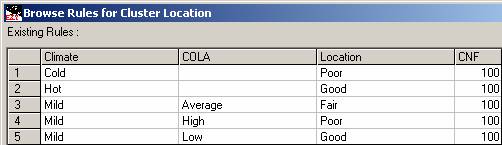
Note that we have not assigned any rules for Climate = Mild. In this case, as we will assign different Action values to Location for different values of COLA, we do not need this simplification. Select this rule and click the Explode button to view all of the possible rules for Climate = Fair.
Select the rules with missing Action values and click the Edit Rule button to launch the Custom Rule Builder. Create the following rules.
· IF Climate = Cold and COLA = High THEN Location = Poor
· IF Climate = Cold and COLA = Low THEN Location = Poor
Edit the rule containing Climate = Mild. Add the condition that COLA = Average, and assign a value of Fair to Location. Then use the New Rule Button to create the following rules.
· IF Climate = Mild and COLA = High THEN Location = Poor
· IF Climate = Mild and COLA = Low THEN Location = Good
All of the rules have now been assigned.
At this point, you may Refine and Optimize the project, or you can test the rules for accuracy before continuing.
Step 5: Refine and Optimize the Project
The project is now complete, consistent, and accurate. It is not, however, concise. EZ-Xpert 3.0 performs both logical simplification and numeric range simplification on the rule cluster to derive a minimal rule cluster. This option leads to the Clusters Needing Refining window showing the clusters needing refinement.
All Deterministic rules should be Refined. The truth-preserving simplification algorithms in EZ-Xpert 3.0 are intended for use with Deterministic rules, and these rule clusters are shown in the Clusters Needing Refinement window.
Any Rule Type can be simplified from the Analyze window. If simplification is performed on other Rule Types, inaccuracies may occur because of missing values or inconsistencies. The Undo / Redo button in the Rule Browser can be used to toggle back and forth between two versions of the rules for comparison.
It should be noted that the simplification algorithms used in EZ-Xpert 3.0 are biased towards effectiveness instead of efficiency. The computational efficiency of refinement is dictated by the physical number of rules that are simplified. Rule clusters containing over 400 physical rules will require minutes to simplify, and extremely large rule clusters may not be computationally tractable. It is possible to create rule clusters that cannot fit into any computer’s memory.
From the main menu, select Application > Refine Application.
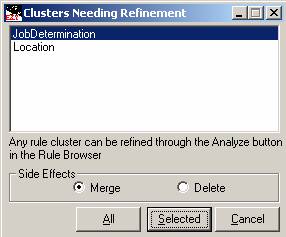
This window lists the Deterministic rule clusters that need refinement. It also allows the developer to determine how the simplification algorithm handles Side Effects. Side Effects include external activities, user-supplied code, and Display statements. If Merge (the default) is selected, all of the Side Effects in the refined rules are merged into Side Effects for the new, simplified rule. If Delete is selected, all Side Effects will be removed from simplified rules.
If you select Merge and click the All button, EZ-Xpert 3.0 will simplify all of the rule clusters needing simplification.
The simplification for the Location rule cluster is:
The Job rule cluster simplification is:
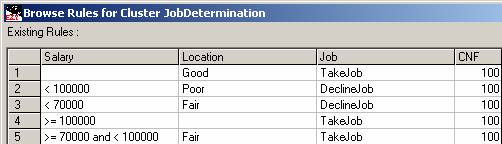
In addition to the traditional simplification, EZ-Xpert 3.0 also performs range simplification. Note rule 2 in the Job rule cluster. There is no defined numeric range < 100000. EZ-Xpert 3.0 simplified two rules where Location = Poor and Job = DeclineJob. The first rule tested for Salary < 70000, and the second one for Salary >= 70000 and Salary < 100000.
The power of the combination of logical and range simplification is shown in the Chess sample file. The Cartesian product of Chess is represented in 648 rules containing 4,536 clauses (condition tests). After simplification, the same knowledge is contained in 13 rules containing 44 clauses.
Optimization
When all rule clusters are finished, run the Debugger. If no errors (besides Rule Base Not Optimized) are shown, prepare the rules for execution by using the Optimize function. This function algorithmically Optimizes the rule base for accuracy and efficiency at run time.
From the main menu, select Application > Optimize. A progress window will be displayed. When Optimization is complete, we can run the expert system.
Step 6: Test the Project
Next, run a sample consultation from the main menu, select Application > Run. It is preferred for the rules to be Refined and Optimized before testing, and warning messages will be given if these steps have not been performed.
The Internal Inference Engine is designed for use by the developer in testing the expert system for accuracy. It executes like the generated code, but has additional functionality, such as Learning, to assist in testing. There are three other differences between the operation of the Internal Inference Engine and the operation of the generated code. They are:
· The implementation Explanation will not show the rule numbers.
· The Fact function does not allow the user to save the facts under a different name, but it will allow the user to select a Fact File created with the Interpreted Inference Engine.
· If an incomplete rule cluster cannot reach a conclusion with the current Facts, the Internal Inference Engine will ask for a value for the Action(s) in the rule cluster. The generated code will apply the default for the Action.
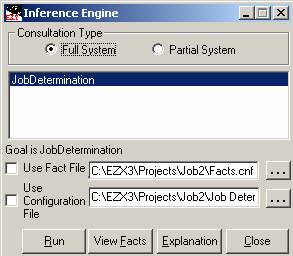
The Full System option runs the entire project, seeking the Goal Action. The Partial System option lists all of the rule clusters, and the developer may choose to run any portion of the system.
EZ-Xpert 3.0 supports several ways to gather data for a consultation. Each consultation produces a Fact File containing the values from the consultation. The user may enter Facts before or during a consultation. The Configuration File is intended for static data, such as external code for SQL queries that are expanded at run time, and external variables used for outputs.
If data is supplied by Facts or a Configuration File, EZ-Xpert 3.0 will forward chain over the data and fire any possible rules. If the consultation is not satisfied, it will then backward chain and ask the user for needed values.
To run the Internal Inference Engine, click the Run button. The data input window will appear for the values needed for the consultation.
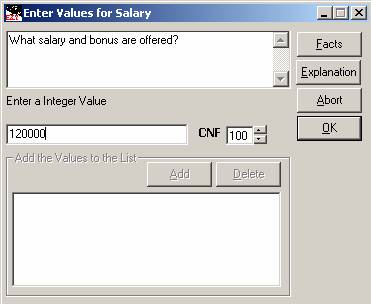
The Values window shows the question for the user at the top. Next, the user enters a value in the entry box and a CNF to the right of the value. In this example, a value of 120,000 is being assigned to the Condition Salary. If the Condition is multi-valued, the list box at the bottom of the window will store the values. Click the Add button to add a value. You may also select a value and remove it by clicking the Delete button. Click the OK button to input the value.
If a Help file is assigned to this Condition, a Help button will appear so the user can invoke the Help feature. If present, a picture will be shown on the left hand side of the window. Facts and Explanations are supported in the Internal Inference Engine. The generated code has the option to support these functions.
At any time during the consultation, the user may click the Abort button to stop the consultation. The user may choose to see the Explanation, which shows the rules fired during the consultation and all of the values obtained. The Fact button allows the user to see the values assigned by files, the user, or the consultation.
Facts may be specified before a consultation begins, which invokes forward chaining, or during the consultation. If Fact modifications occur during the consultation, EZ-Xpert 3.0 considers the consultation to be non-monotonic. It will then retract any Actions assigned in the consultation and forward chain over the other Facts.
When the goal has been assigned or the consultation fails, the Consultation Complete window is shown. The top of this window shows any Display statements that are included in the satisfied rules. The bottom portion shows the solutions found for the current consultation.
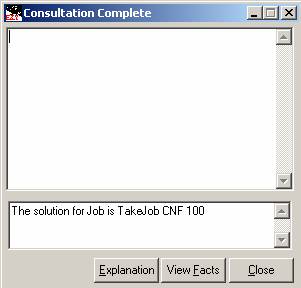
The Explanation for this consultation is:
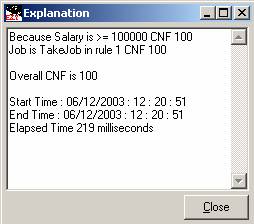
The Explanation shows the rules that fired during the consultation and the conclusions reached. It also shows the overall CNF for the consultation and the elapsed time.
The Fact File shows the values input or assigned during the consultation.
Note: When working with Facts, it is important to notice that Action values assigned during the consultation are saved in the Fact File. To remove them, click the Clear Actions button in the Facts window.
Action values are not saved to Configuration Files.

The developer may choose to create sets of Fact Files to test various portions of the rule base. This allows quickly repeatable tests to be performed during development and after maintenance. They may also be supplied to the end user for use at run time.
When the project runs correctly in the Internal Inference Engine, we may generate the implementation. We may also wish to customize the project.
Step 7: Customize the Project
EZ-Xpert 3.0 offers several ways to customize the generated code. These can be performed at any time, but it is best to perform customization after simplification is complete and before code is generated.
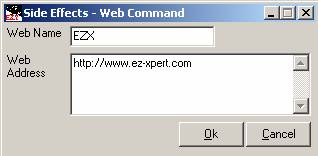
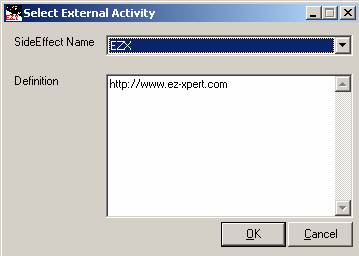
The Web Name is used to refer to the command – this value will be selected to perform the activity. In this example, the EZX External Activity will open the EZ-Xpert web site home page in a browser.
External Activities can be performed when a rule fires or when the consultation concludes. To assign this command to a rule, we first must load the rule cluster. From the main menu, select Edit > Rules > JobDetermination > Rule Browser. Click on rule 1 to select it, and click the Edit Rule button. To add an External Activity to this rule, click the External Activities button.
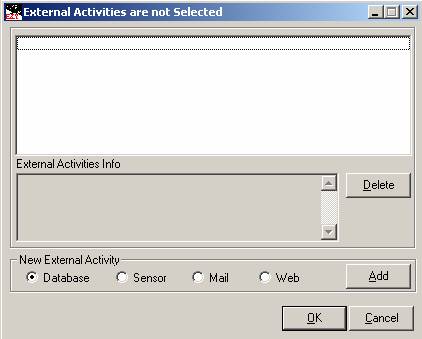
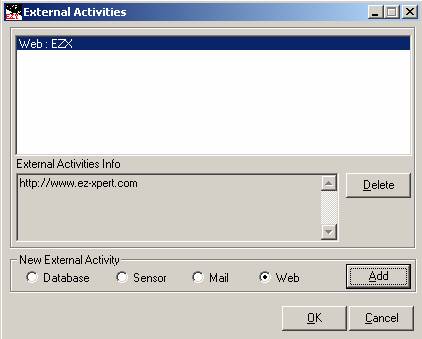
The External Activities window displays the External Activities that have been assigned, which is currently none, at the top of the window. To add a new External Activity, select the type of activity by selecting the appropriate radio button (database, sensor, mail, web) and then click the Add button. The Select External Activity window is used to select the activity. Select the desired activity in the External Activity box and click the OK button to add the activity.
The completed External Activities window is shown below. When the OK button is clicked, this activity will be added to the rule. In this case, if the salary is over 100000, the end user will be shown the EZ-Xpert web site in a browser window.
From the main menu, select Application > Run. Click the Run button to begin the consultation (with Fact File and Configuration File unchecked). The first question asks for a value for Salary. Enter 120000 ($120,000), and rule 1 will fire. The EZ-Xpert home page will load in a browser window and EZ-Xpert 3.0 will present the Consultation Complete window stating that Job is TakeJob.
The Project Data window (in the main menu, select File > Project Data) allows customization at a project level. In addition to allowing languages to be deleted (but not added) and controlling Access, it offers support for External Activities and user supplied, language-specific Pre and Post code. Pre- and post-code are not verified by EZ-Xpert 3.0. Pre code will be performed immediately after the application loads, and the Post code is performed after the consultation is complete.
Exit Options are also controlled from this window. Exit Options support External Activities and user-supplied code for different possible outcomes of the consultation in both the Internal Inference Engine (IE) and in the generate code (GC). The supported outcomes are Success, Fail, Abort, Learn, and User.
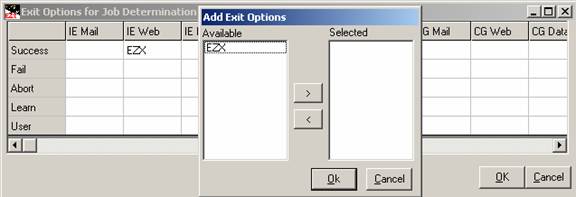
Activities specified in the Success row are performed when the consultation concludes successfully by assigning a value to the goal variable. Fail activities are performed when the consultation did not assign a value to the conclusion and this is an acceptable outcome (if for example, the project does not expect success in every consultation). Abort activities are performed when the end user does not complete the consultation by clicking the Abort button. Learn is performed when Learning occurs during the consultation (this functionality is currently supported in the Internal Inference Engine). The User activities are performed if the consultation fails because of a failure in the user-supplied code.
To assign the EZX Web Command to Success in the Internal Inference Engine (IE), double click in the IE Web column in the Success row. The Add Exit Options window will appear and show all of the available web commands. Select EZX and click the > arrow key to add it to the list of activities that will be performed and click the OK button.
You may wish to enhance the user interface for the implementation platform. EZ-Xpert 3.0 will generate an initial interface that you can modify and include as Custom Code. Edit the generated code. Find out which section of the EZ-Xpert 3.0 code contains the interface code. Delete the blocks that do not contain interface code, and save the remaining EZ-Xpert 3.0 code block using the name and location specified in the generated code. Modify this file to enhance the interface. EZ-Xpert 3.0 will include this code instead of the generic interface.
Step 8: Generate Code
Code may be generated from the main menu, select Application > Generate Code or by using the Code Generation Wizard. To use the Wizard, in the main menu, select Wizards > Code Generator Wizard.
Code Generator Wizard
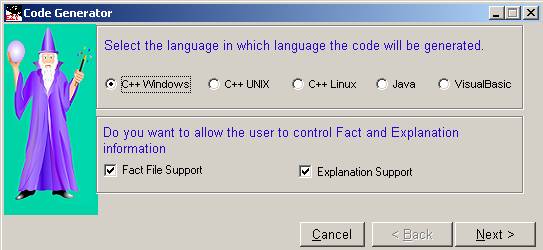
The first window determines the language to generate. Select the radio buttons to choose the output code desired. The window also contains check boxes for Fact File and Explanation support for the end user. Explanations show the rules used to determine the conclusions. If the knowledge is proprietary, Explanation Support may be undesirable.
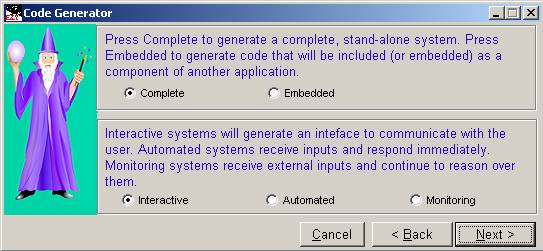
The next window determines what kind of system to generate. The Complete option generates code that is ready to compile and run as an application. The embedded option generates code suitable for embedding in another application as an intelligent component.
Execution of the consultation may take three forms: Interactive, Automated, and Monitoring. The Interactive systems provide a user interface to elicit values and display responses. If a value is needed, a window will ask the user. Interactive systems support forward chaining over passed Facts and backward chaining over unknown Facts. Note that the generated code will not attempt to Learn. If any rule cluster cannot be satisfied, the Default activity for the Action will be performed.
Both Automated systems and Monitoring systems forward chain over passed Facts and contain no user interface. Automated systems reason over the Facts that are passed at run time as parameters, Fact File, Configuration File, or Pre code. When all rules have been tested, the consultation is complete and the values or a fail message are returned to the calling code. Monitoring systems accept static Facts as above, or asynchronous inputs such as sensors. Monitoring systems continue to accept inputs until the system succeeds.
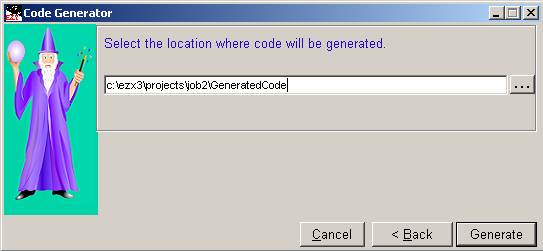
For this example, choose Interactive. Next, the Wizard elicits the location where the code will be generated. When it is selected, click the Generate button and the project will be generated. New directories may be created.
The Wizard will now generate code.
Optionally, the developer may generate code from the main menu, select Application > Generate Code. The Code Generators window will gather the same information as the Wizards.
Code Generator Editor

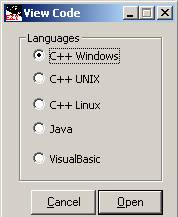
To load the generated code into the delivery environment, the delivery compiler must be specified in the Software window. If it has been installed, the generated code can be loaded from the main menu, select Application > View Code. Select the appropriate language and click the Open button to load the generated code.
In this example, we have loaded the C++ for Windows code into the Microsoft C++ compiler. To create the application from the main menu, select Build > Build JobDetermination.exe. After compiling, the application can be run independently of EZ-Xpert 3.0 and the host environment. The application will be located in the Debug folder beneath the folder containing the generated code. Double click on the JobDetermination file to perform a consultation.
The project is now complete.